源码共读 - cursor-effects

cursor-effects全称 90s Cursor Effects ,是一个网页端鼠光标特效库。具体效果可以看这里

基本使用

使用方式非常简单,只要引入对应的光标特效函数,然后调用即可。

1
2
3
4
5
6
import { emojiCursor } from "cursor-effects";

const cursor = new emojiCursor({ emoji: ["🔥", "🐬", "🦆"] });

// 可以调用下面函数销毁
// cursor.destroy();

在写这篇文章的时候,目前支持 12种 光标特效,后面有可能会增加,具体如下:

  • Rainbow Cursor
  • Emoji Rain
  • Elastic Emoji
  • Ghost Following
  • Trailing Cursor
  • Text Flag Cursor
  • Following Dot
  • Bubbles Particles
  • Snowflake Particles
  • Fairy Dust
  • Clock Cursor
  • Character Cursor

每一种光标特效的参数稍微有些差异,具体可以看Github中的简绍。

emojiCursor

cursor-effects 暴露了12个光标特效函数,每一个函数的基本结构大致都是相同的,我们这里先以 emojiCursor 为例。
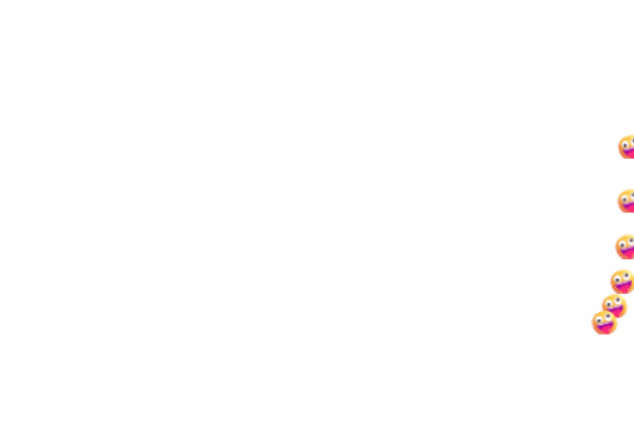
emojiCursor 的效果如下:

emojiCursor

emojiCursor 的函数结构,如下:

1
2
3
4
5
6
7
8
9
10
11
12
13
14
15
16
17
18
19
20
21
22
23
24
25
26
27
28
29
30
31
32
33
34
35
36
37
38
39
40
41
42
43
44
45
46
47
48
49
50
51
52
53
54
55
56
57
58
59
60
61
62
63
64
65
66
67
68
69
70
71
72
73
74
75
76
77
export function emojiCursor(options) {
// ... 其他代码

const prefersReducedMotion = window.matchMedia(
"(prefers-reduced-motion: reduce)"
);

// Re-initialise or destroy the cursor when the prefers-reduced-motion setting changes
prefersReducedMotion.onchange = () => {
if (prefersReducedMotion.matches) {
destroy();
} else {
init();
}
};

function init() {
if (prefersReducedMotion.matches) {
console.log(
"This browser has prefers reduced motion turned on, so the cursor did not init"
);
return false;
}
// ... 初始化逻辑
bindEvents();
loop();
}

// Bind events that are needed
function bindEvents() {
element.addEventListener("mousemove", onMouseMove, { passive: true });
element.addEventListener("touchmove", onTouchMove, { passive: true });
element.addEventListener("touchstart", onTouchMove, { passive: true });
window.addEventListener("resize", onWindowResize);
}

function onWindowResize(e) {
// ... 窗口重置逻辑
}

function onTouchMove(e) {
// ... 触摸逻辑
}

function onMouseMove(e) {
// ... 鼠标移动逻辑
}

function updateParticles() {
// ... 更新粒子逻辑
}

function loop() {
updateParticles();
animationFrame = requestAnimationFrame(loop);
}

function destroy() {
canvas.remove();
cancelAnimationFrame(animationFrame);
element.removeEventListener("mousemove", onMouseMove);
element.removeEventListener("touchmove", onTouchMove);
element.removeEventListener("touchstart", onTouchMove);
window.addEventListener("resize", onWindowResize);
}

function Particle(x, y, canvasItem) {
// 其他代码
}

init();

return {
destroy: destroy,
};
}

由上可见,emojiCursor 函数调用了 init 函数来初始化光标特效,同时返回一个含有 destroy 方法的对象。

上面还有一段 prefersReducedMotion 相关的代码,如果用户开启了 prefers-reduced-motion: reduce 则不展示光标特效,以避免对用户造成过度刺激(如癫痫患者或对动态内容敏感的用户)。

init 函数

emojiCursor 函数内部的 init 函数如下:

1
2
3
4
5
6
7
8
9
10
11
12
13
14
15
16
17
18
19
20
21
22
23
24
25
26
27
28
29
30
31
32
33
34
35
36
37
38
39
40
41
42
43
44
45
46
47
48
49
50
51
52
53
54
55
56
57
58
59
60
61
62
63
64
65
66
67
68
69
70
71
72
73
74
75
76
export function emojiCursor(options) {
const possibleEmoji = (options && options.emoji) || ["😀", "😂", "😆", "😊"];
const delay = (options && options.delay) || 16;
let hasWrapperEl = options && options.element;
let element = hasWrapperEl || document.body;

let width = window.innerWidth;
let height = window.innerHeight;
const cursor = { x: width / 2, y: width / 2 };
const lastPos = { x: width / 2, y: width / 2 };
let lastTimestamp = 0;
const particles = [];
const canvImages = [];
let canvas, context, animationFrame;

// ... prefersReducedMotion 相关代码

function init() {
// Don't show the cursor trail if the user has prefers-reduced-motion enabled
if (prefersReducedMotion.matches) {
console.log(
"This browser has prefers reduced motion turned on, so the cursor did not init"
);
return false;
}

canvas = document.createElement("canvas");
context = canvas.getContext("2d");

canvas.style.top = "0px";
canvas.style.left = "0px";
canvas.style.pointerEvents = "none";
canvas.style.zIndex = options.zIndex || "9999999999";

if (hasWrapperEl) {
canvas.style.position = "absolute";
element.appendChild(canvas);
canvas.width = element.clientWidth;
canvas.height = element.clientHeight;
} else {
canvas.style.position = "fixed";
document.body.appendChild(canvas);
canvas.width = width;
canvas.height = height;
}

context.font = "21px serif";
context.textBaseline = "middle";
context.textAlign = "center";

possibleEmoji.forEach((emoji) => {
let measurements = context.measureText(emoji);
let bgCanvas = document.createElement("canvas");
let bgContext = bgCanvas.getContext("2d");

bgCanvas.width = measurements.width;
bgCanvas.height = measurements.actualBoundingBoxAscent * 2;

bgContext.textAlign = "center";
bgContext.font = "21px serif";
bgContext.textBaseline = "middle";
bgContext.fillText(
emoji,
bgCanvas.width / 2,
measurements.actualBoundingBoxAscent
);

canvImages.push(bgCanvas);
});

bindEvents();
loop();
}

}

emojiCursor 函数刚开始中,这里可以设置 emojidelayelementzIndex 四个参数,然后定义了一些变量。init 函数中,先创建 canvas 根据是否传 element 来判断挂载到 element 还是 document.body 中。然后根据传入的 possibleEmoji 绘制到 canvas 上,并把绘制有 emojicanvas 保存在 canvImages 数组里,这样后面可以通过 context.drawImage() 来绘制这个 emoji。最后调用 bindEvents() 绑定鼠标移动事件,并调用 loop() 函数开始动画循环。

bindEvents 函数如下,监听鼠标、触摸和窗口重置事件。

1
2
3
4
5
6
7
8
9
10
11
12
13
14
15
16
17
18
19
function bindEvents() {
element.addEventListener("mousemove", onMouseMove, { passive: true });
element.addEventListener("touchmove", onTouchMove, { passive: true });
element.addEventListener("touchstart", onTouchMove, { passive: true });
window.addEventListener("resize", onWindowResize);
}

function onWindowResize(e) {
width = window.innerWidth;
height = window.innerHeight;

if (hasWrapperEl) {
canvas.width = element.clientWidth;
canvas.height = element.clientHeight;
} else {
canvas.width = width;
canvas.height = height;
}
}

onMouseMove 函数和 onTouchMove 函数分别处理鼠标和触摸事件,核心逻辑是获取鼠标或触摸位置,并添加粒子。鼠标和触摸稍微有点不同的地方是触摸的时候直接在触发的位置添加粒子,而鼠标移动的时候有节流操作,同时移动超过1像素才添加粒子。onMouseMove 事件之所有在 onMouseMove 中使用
requestAnimationFrame, 是因为它结合 lastTimestamp 做了节流,可以限制 requestAnimationFrame 中的函数每一帧只执行一次,避免同一帧内多次执行导致性能浪费。

1
2
3
4
5
6
7
8
9
10
11
12
13
14
15
16
17
18
19
20
21
22
23
24
25
26
27
28
29
30
31
32
33
34
35
36
37
38
39
40
41
42
43
44
45
46
47
48
49
50
function onTouchMove(e) {
if (e.touches.length > 0) {
for (let i = 0; i < e.touches.length; i++) {
addParticle(
e.touches[i].clientX,
e.touches[i].clientY,
canvImages[Math.floor(Math.random() * canvImages.length)]
);
}
}
}

function onMouseMove(e) {
// Dont run too fast
if (e.timeStamp - lastTimestamp < delay) {
return;
}

window.requestAnimationFrame(() => {
if (hasWrapperEl) {
const boundingRect = element.getBoundingClientRect();
cursor.x = e.clientX - boundingRect.left;
cursor.y = e.clientY - boundingRect.top;
} else {
cursor.x = e.clientX;
cursor.y = e.clientY;
}

const distBetweenPoints = Math.hypot(
cursor.x - lastPos.x,
cursor.y - lastPos.y
);

if (distBetweenPoints > 1) {
addParticle(
cursor.x,
cursor.y,
canvImages[Math.floor(Math.random() * possibleEmoji.length)]
);

lastPos.x = cursor.x;
lastPos.y = cursor.y;
lastTimestamp = e.timeStamp;
}
});
}

function addParticle(x, y, img) {
particles.push(new Particle(x, y, img));
}

Particle 函数

Particle 函数定义的是粒子类,它放在每一个光标特效函数的内部,因为每种特效稍微有点不同。 emojiCursor 中的 Particle 函数接收三个参数,分别是粒子的初始位置 xy,以及要绘制的 canvas(即 emoji)。在 Particle 函数中,定义了粒子的生命周期 lifeSpan、速度 velocity、位置 positionupdate 方法中,根据粒子的速度更新粒子的位置,同时减少 lifeSpan,并根据 lifeSpan 计算缩放比例,最后调用 context.drawImage() 绘制粒子,这里 scale 会随着 lifeSpan 的变小而变小,所以就有了 emoji 变小的效果。

1
2
3
4
5
6
7
8
9
10
11
12
13
14
15
16
17
18
19
20
21
22
23
24
25
26
27
28
29
function Particle(x, y, canvasItem) {
const lifeSpan = Math.floor(Math.random() * 60 + 80);
this.initialLifeSpan = lifeSpan; //
this.lifeSpan = lifeSpan; //ms
this.velocity = {
x: (Math.random() < 0.5 ? -1 : 1) * (Math.random() / 2),
y: Math.random() * 0.4 + 0.8,
};
this.position = { x: x, y: y };
this.canv = canvasItem;

this.update = function (context) {
this.position.x += this.velocity.x;
this.position.y += this.velocity.y;
this.lifeSpan--;

this.velocity.y += 0.05;

const scale = Math.max(this.lifeSpan / this.initialLifeSpan, 0);

context.drawImage(
this.canv,
this.position.x - (this.canv.width / 2) * scale,
this.position.y - this.canv.height / 2,
this.canv.width * scale,
this.canv.height * scale
);
};
}

updateParticles 函数

loop 函数中调用 updateParticles 函数,更新粒子的位置和生命周期,然后开启动画循环。updateParticles 函数每一帧执行一次,它会更新粒子的位置并绘制,对于 lifeSpan 小于 0 的粒子,会从数组中删除。

1
2
3
4
5
6
7
8
9
10
11
12
13
14
15
16
17
18
19
20
21
22
23
24
25
26
27
28
function loop() {
updateParticles();
animationFrame = requestAnimationFrame(loop);
}

function updateParticles() {
if (particles.length == 0) {
return;
}

context.clearRect(0, 0, width, height);

// Update
for (let i = 0; i < particles.length; i++) {
particles[i].update(context);
}

// Remove dead particles
for (let i = particles.length - 1; i >= 0; i--) {
if (particles[i].lifeSpan < 0) {
particles.splice(i, 1);
}
}

if (particles.length == 0) {
context.clearRect(0, 0, width, height);
}
}

上面200多行代码就实现了 emoji 的光标动画效果。

fairyDustCursor

fairyDustCursor 的效果如下,效果与 emojiCursor 类似,只是掉落 emoji 换成了掉落星星。

fairyDustCursor

fairyDustCursor 的代码与 emojiCursor 几乎相同,如下,只是把绘制 emoji 替换为绘制不同颜色的星号 * (即 fairySymbol 变量对应的符号),其他代码几乎一样只是粒子参数稍微修改了一下。

1
2
3
4
5
6
7
8
9
10
11
12
13
14
15
16
17
18
19
20
21
22
23
24
25
26
27
28
29
30
31
32
33
34
export function fairyDustCursor(options) {
let possibleColors = (options && options.colors) || [
"#D61C59",
"#E7D84B",
"#1B8798",
];
// ... 忽略相同的代码

const char = options.fairySymbol || "*";

// ... 忽略 prefersReducedMotion 相关代码

function init() {

// ... 忽略相同的创建 canvas 代码

possibleColors.forEach((color) => {
// ... 忽略相同代码
bgContext.fillStyle = color;
bgContext.fillText(
char,
bgCanvas.width / 2,
measurements.actualBoundingBoxAscent
);

canvImages.push(bgCanvas);
});

bindEvents();
loop();
}

// ... 忽略类似代码
}

bubbleCursor

bubbleCursor 的效果如下,鼠标移动时,会生成一些小泡泡,小泡泡会浮起来并且越来越大,然后消失。

bubbleCursor

bubbleCursor 代码如下:

1
2
3
4
5
6
7
8
9
10
11
12
13
14
15
16
17
18
19
20
21
22
23
24
25
26
27
28
29
30
31
32
33
34
35
36
37
38
39
40
41
42
43
44
45
46
47
48
export function bubbleCursor(options) {
let fillColor = options && options.fillColor ? options.fillColor : "#e6f1f7";
let strokeColor = options && options.strokeColor ? options.strokeColor : "#3a92c5";

// ... 忽略类似代码
function Particle(x, y) {
const lifeSpan = Math.floor(Math.random() * 60 + 60);
this.initialLifeSpan = lifeSpan; //
this.lifeSpan = lifeSpan; //ms
this.velocity = {
x: (Math.random() < 0.5 ? -1 : 1) * (Math.random() / 10),
y: -0.4 + Math.random() * -1,
};
this.position = { x: x, y: y };

this.baseDimension = 4;

this.update = function (context) {
this.position.x += this.velocity.x;
this.position.y += this.velocity.y;
this.velocity.x += ((Math.random() < 0.5 ? -1 : 1) * 2) / 75;
this.velocity.y -= Math.random() / 600;
this.lifeSpan--;

const scale =
0.2 + (this.initialLifeSpan - this.lifeSpan) / this.initialLifeSpan;

context.fillStyle = fillColor;
context.strokeStyle = strokeColor;
context.beginPath();
context.arc(
this.position.x - (this.baseDimension / 2) * scale,
this.position.y - this.baseDimension / 2,
this.baseDimension * scale,
0,
2 * Math.PI
);

context.stroke();
context.fill();

context.closePath();
};
}

// ... 忽略类似代码
}

bubbleCursoremojiCursor 代码也类似,只是 Particle 函数稍有不同,emojiCursor 函数的 Particle 函数是 drawImagebubbleCursor 函数的 Particle 函数是调用 arc 画圆(泡泡)。

followingDotCursor

followingDotCursor 的效果如下,鼠标移动时,会有一个跟随鼠标移动的圆点。

followingDotCursor

followingDotCursor 代码如下:

1
2
3
4
5
6
7
8
9
10
11
12
13
14
15
16
17
18
19
20
21
22
23
24
25
26
27
28
29
30
31
32
33
34
export function followingDotCursor(options) {
// ... 忽略类似代码
let dot = new Dot(width / 2, height / 2, 10, 0.1);
let color = options?.color || "#323232a6";

function updateDot() {
context.clearRect(0, 0, width, height);
dot.moveTowards(cursor.x, cursor.y, context);
}

function loop() {
updateDot();
animationFrame = requestAnimationFrame(loop);
}

function Dot(x, y, width, lag) {
this.position = { x: x, y: y };
this.width = width;
this.lag = lag;

this.moveTowards = function (x, y, context) {
this.position.x += (x - this.position.x) * this.lag;
this.position.y += (y - this.position.y) * this.lag;

context.fillStyle = color;
context.beginPath();
context.arc(this.position.x, this.position.y, this.width, 0, 2 * Math.PI);
context.fill();
context.closePath();
};
}

// ... 忽略类似代码
}

followingDotCursor 把粒子命名成了 Dot,而且只有一个粒子。因为圆点要跟随鼠标移动,所以用到了缓动动画。缓动动画公式如下,缓动动画更多详情可以看这里

当前速度 = (最终位置 - 当前位置) * 缓动系数。
新的位置 = 当前位置 + 当前速度。

trailingCursor

trailingCursor 的效果如下,鼠标移动时,会有一系列的鼠标做缓动动画。

trailingCursor

trailingCursor 的代码如下:

1
2
3
4
5
6
7
8
9
10
11
12
13
14
15
16
17
18
19
20
21
22
23
24
25
26
27
28
29
30
31
32
33
34
35
36
37
38
39
40
41
42
43
44
45
46
47
48
49
50
51
52
53
54
55
56
57
58
59
60
61
62
63
64
65
export function trailingCursor(options) {
le
const totalParticles = options?.particles || 15;
const rate = options?.rate || 0.4;
const baseImageSrc = options?.baseImageSrc || "data:image/png;xxx"; // 默认光标的base64图片 太长了 这里省略
let cursorsInitted = false;

let baseImage = new Image();
baseImage.src = baseImageSrc;

// ... 忽略类似代码

function onMouseMove(e) {
if (hasWrapperEl) {
const boundingRect = element.getBoundingClientRect();
cursor.x = e.clientX - boundingRect.left;
cursor.y = e.clientY - boundingRect.top;
} else {
cursor.x = e.clientX;
cursor.y = e.clientY;
}

// 首次鼠标移动时一次性添加所有粒子
if (cursorsInitted === false) {
cursorsInitted = true;
for (let i = 0; i < totalParticles; i++) {
addParticle(cursor.x, cursor.y, baseImage);
}
}
}

function updateParticles() {
context.clearRect(0, 0, width, height);

let x = cursor.x;
let y = cursor.y;

particles.forEach(function (particle, index, particles) {
let nextParticle = particles[index + 1] || particles[0];

particle.position.x = x;
particle.position.y = y;
particle.move(context);
x += (nextParticle.position.x - particle.position.x) * rate;
y += (nextParticle.position.y - particle.position.y) * rate;
});
}

// ... 忽略类似代码

function Particle(x, y, image) {
this.position = { x: x, y: y };
this.image = image;

this.move = function (context) {
context.drawImage(
this.image,
this.position.x, // - (this.canv.width / 2) * scale,
this.position.y //- this.canv.height / 2,
);
};
}

// ... 忽略类似代码
}

鼠标的样式由 baseImageSrc 决定,默认给了一个默认鼠标样式的base64图片。Particle 只要在特定位置绘制图片即可。在 updateParticles 中,第一个粒子是鼠标的位置(cursor.xcursor.y),其他粒子是根据前一个粒子的位置做缓动动画,这样就有了一系列的跟随东海。需要注意的是最后一个粒子没有下一个粒子,这里把第一个粒子赋值给 nextParticle,是为了让程序走下去,最后一个的 nextParticle 计算出来的 xy 不会被使用到。

springyEmojiCursor

springyEmojiCursor 的效果如下,相当于把多个 emoji 用一根绳子连接在了一起。

springyEmojiCursor

springyEmojiCursor 的代码如下:

1
2
3
4
5
6
7
8
9
10
11
12
13
14
15
16
17
18
19
20
21
22
23
24
25
26
27
28
29
30
31
32
33
34
35
36
37
38
39
40
41
42
43
44
45
46
47
48
49
50
51
52
53
54
55
56
export function springyEmojiCursor(options) {
let emoji = (options && options.emoji) || "🤪";

let nDots = 7;
let DELTAT = 0.01;
let SEGLEN = 10;
let SPRINGK = 10;
let MASS = 1;
let GRAVITY = 50;
let RESISTANCE = 10;
let STOPVEL = 0.1;
let STOPACC = 0.1;
let DOTSIZE = 11;
let BOUNCE = 0.7;

let emojiAsImage;

// ... 忽略类似代码
function init() {
// ... 忽略类似代码

// 把 emoji 转换为 canvas 跟 emojiCursor 中的 canvImages 代码一样只不过这里是一个
emojiAsImage = bgCanvas;

let i = 0;
for (i = 0; i < nDots; i++) {
particles[i] = new Particle(emojiAsImage);
}

bindEvents();
loop();
}

// ... 忽略类似代码
function Particle(canvasItem) {
this.position = { x: cursor.x, y: cursor.y };
this.velocity = {
x: 0,
y: 0,
};

this.canv = canvasItem;

this.draw = function (context) {
context.drawImage(
this.canv,
this.position.x - this.canv.width / 2,
this.position.y - this.canv.height / 2,
this.canv.width,
this.canv.height
);
};
}

// ... 忽略类似代码
}

目前看上面代码没啥特别的,绳子弹性效果的代码在 updateParticles 中。

1
2
3
4
5
6
7
8
9
10
11
12
13
14
15
16
17
18
19
20
21
22
23
24
25
26
27
28
29
30
31
32
33
34
35
36
37
38
39
40
41
42
43
44
45
46
47
48
49
50
51
52
53
54
55
56
57
58
59
60
61
62
63
64
65
66
67
68
69
70
71
72
73
74
75
76
77
78
79
80
81
82
83
84
85
86
87
88
89
90
91
// 二维向量类
function vec(X, Y) {
this.X = X;
this.Y = Y;
}

function updateParticles() {
canvas.width = canvas.width;

// follow mouse
// 第一个粒子的位置是鼠标位置
particles[0].position.x = cursor.x;
particles[0].position.y = cursor.y;

// Start from 2nd dot
for (let i = 1; i < nDots; i++) {
// 弹性力
let spring = new vec(0, 0);

if (i > 0) {
// 跟前一个粒子的合力
springForce(i - 1, i, spring);
}

if (i < nDots - 1) {
// 跟后一个粒子的合力
springForce(i + 1, i, spring);
}

// 阻力 方向速度的反方向 大小速度乘以阻尼系数来近似模拟
let resist = new vec(
-particles[i].velocity.x * RESISTANCE,
-particles[i].velocity.y * RESISTANCE
);

// 加速度 = 力 / 质量
let accel = new vec(
(spring.X + resist.X) / MASS,
(spring.Y + resist.Y) / MASS + GRAVITY
);

// 计算速度 这里算出来值过大 所以乘以了一个系数 DELTAT
particles[i].velocity.x += DELTAT * accel.X;
particles[i].velocity.y += DELTAT * accel.Y;

// 速度过小则停止
if (
Math.abs(particles[i].velocity.x) < STOPVEL &&
Math.abs(particles[i].velocity.y) < STOPVEL &&
Math.abs(accel.X) < STOPACC &&
Math.abs(accel.Y) < STOPACC
) {
particles[i].velocity.x = 0;
particles[i].velocity.y = 0;
}

// 计算位置
particles[i].position.x += particles[i].velocity.x;
particles[i].position.y += particles[i].velocity.y;

let height, width;
height = canvas.clientHeight;
width = canvas.clientWidth;

// 粒子超出下边距处理
if (particles[i].position.y >= height - DOTSIZE - 1) {
if (particles[i].velocity.y > 0) {
particles[i].velocity.y = BOUNCE * -particles[i].velocity.y;
}
particles[i].position.y = height - DOTSIZE - 1;
}

// 粒子超出右边距处理
if (particles[i].position.x >= width - DOTSIZE) {
if (particles[i].velocity.x > 0) {
particles[i].velocity.x = BOUNCE * -particles[i].velocity.x;
}
particles[i].position.x = width - DOTSIZE - 1;
}

// 粒子超出左边距处理
if (particles[i].position.x < 0) {
if (particles[i].velocity.x < 0) {
particles[i].velocity.x = BOUNCE * -particles[i].velocity.x;
}
particles[i].position.x = 0;
}

particles[i].draw(context);
}
}

上述用到了基础力学知识,先计算出 弹力(spring)阻力(resist),然后根据他们和重力计算出加速度,最后根据加速度计算出速度和位置,代码有点长不过根据注释来看条理还是很清晰。最后对超出边界处理,处理方式是速度反向并乘以一个小于1的系数来模拟弹性反弹并损失部分速度的过程,位置则修改到刚触碰到边界的位置。

这里还有一个 springForce 函数,用来计算两个粒子之间的弹力,代码如下。

1
2
3
4
5
6
7
8
9
10
function springForce(i, j, spring) {
let dx = particles[i].position.x - particles[j].position.x;
let dy = particles[i].position.y - particles[j].position.y;
let len = Math.sqrt(dx * dx + dy * dy);
if (len > SEGLEN) {
let springF = SPRINGK * (len - SEGLEN);
spring.X += (dx / len) * springF;
spring.Y += (dy / len) * springF;
}
}

先计算出绳子的长度,如果绳子比原来的长度伸长了,则计算弹力。弹力的大小是 弹性系数 * (绳子拉伸后长度 - 绳子原长度) ,也就是胡克定律,最后根据三角形的相似计算出 x轴y轴 的分弹力。

胡克定律:
弹力 = 弹性系数 * (绳子拉伸后长度 - 绳子原长度)

rainbowCursor

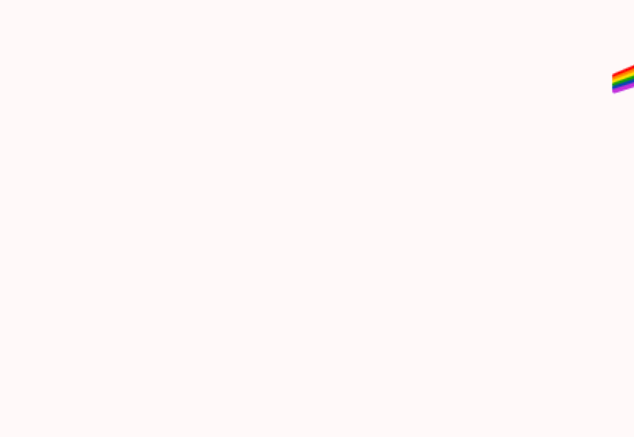
rainbowCursor 的效果如下,光标拥有彩虹的特效。

rainbowCursor

rainbowCursor 的代码如下:

1
2
3
4
5
6
7
8
9
10
11
12
13
14
15
16
17
18
19
20
21
22
23
24
25
26
27
28
29
30
31
32
33
34
35
36
37
38
39
40
41
42
43
44
45
46
47
48
49
50
51
52
53
54
55
56
57
58
59
60
61
62
63
64
65
66
67
68
69
70
71
72
73
74
75
76
77
78
79
export function rainbowCursor(options) {
// ... 忽略类似代码

const totalParticles = options?.length || 20;
// 默认颜色也是有讲究的 按照顺序分别是 赤橙黄绿蓝紫
const colors = options?.colors || [
"#FE0000",
"#FD8C00",
"#FFE500",
"#119F0B",
"#0644B3",
"#C22EDC",
];
const size = options?.size || 3;

function onMouseMove(e) {
// ... 忽略类似代码

// 首次鼠标移动时一次性添加所有粒子
if (cursorsInitted === false) {
cursorsInitted = true;
for (let i = 0; i < totalParticles; i++) {
addParticle(cursor.x, cursor.y);
}
}
}

function updateParticles() {
context.clearRect(0, 0, width, height);
context.lineJoin = "round";

// 用来存放粒子的位置
let particleSets = [];

let x = cursor.x;
let y = cursor.y;

particles.forEach(function (particle, index, particles) {
let nextParticle = particles[index + 1] || particles[0];

particle.position.x = x;
particle.position.y = y;

particleSets.push({ x: x, y: y });

// 缓动动画
x += (nextParticle.position.x - particle.position.x) * 0.4;
y += (nextParticle.position.y - particle.position.y) * 0.4;
});

colors.forEach((color, index) => {
context.beginPath();
context.strokeStyle = color;

if (particleSets.length) {
context.moveTo(
particleSets[0].x,
particleSets[0].y + index * (size - 1)
);
}

particleSets.forEach((set, particleIndex) => {
if (particleIndex !== 0) {
context.lineTo(set.x, set.y + index * size);
}
});

context.lineWidth = size;
context.lineCap = "round";
context.stroke();
});
}

function Particle(x, y) {
this.position = { x: x, y: y };
}

// 首次鼠标移动时一次性添加所有粒子
}

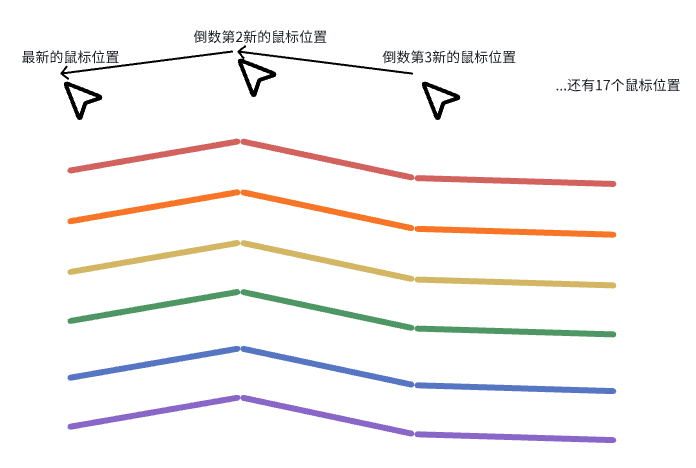
这里的 Particle 只是用来记录坐标,而没有绘制的逻辑,核心逻辑在 updateParticles 中。updateParticles 函数中,第一个粒子的位置是鼠标当前的位置,然后后面的粒子跟前一个粒子做缓动动画,这样就有了彩虹跟随鼠标的缓动效果。彩虹的绘制也是很特别,它是在对应点下画了6条不同颜色的线(彩虹),将 lineCap 设置为 round,使线更加平滑,由于每次鼠标移动的距离很短(都是像素级别的),而每一条线又有 totalParticles - 1(默认20个点,19个小线段)个小线段,这样就有了弯曲的彩虹效果效果。updateParticles 实现的图片通过下面这个图,会更好理解一些,这里假设鼠标从右边移动到左边。

rainbowCursor示意图

还有一些特效,原理与上面类似,这里就不再赘述了

-------------本文结束 感谢您的阅读-------------
0%