源码共读 - grid-layout-plus

grid-layout-plus是一个支持拖动、重新设置大小的网格布局组件。它的代码是在vue-grid-layout的基础上修改的,而 vue-grid-layout 又是参考 gridster.jsreact-grid-layout。我们这里之所以讲 grid-layout-plus 是因为 grid-layout-plus 是基于 vue3 的,而 vue-grid-layout 是基于 vue2 的,当然组件的核心思想都是类似的,看懂一个组件其他的也会明白。

基本使用

我们这里直接用 grid-layout-plus 的官网示例来演示,代码如下:

1
2
3
4
5
6
7
8
9
10
11
12
13
14
15
16
17
18
19
20
21
22
23
24
25
26
27
28
29
30
31
32
33
34
<template>
<GridLayout v-model:layout="layout" :row-height="30">
<template #item="{ item }">
<span class="text">{{ `${item.i}${item.static ? '- Static' : ''}` }}</span>
</template>
</GridLayout>
</template>

<script setup lang="ts">
import { reactive } from 'vue'

const layout = reactive<Layout>([
{ x: 0, y: 0, w: 2, h: 2, i: '0', static: false },
{ x: 2, y: 0, w: 2, h: 4, i: '1', static: true },
{ x: 4, y: 0, w: 2, h: 5, i: '2', static: false },
{ x: 6, y: 0, w: 2, h: 3, i: '3', static: false },
{ x: 8, y: 0, w: 2, h: 3, i: '4', static: false },
{ x: 10, y: 0, w: 2, h: 3, i: '5', static: false },
{ x: 0, y: 5, w: 2, h: 5, i: '6', static: false },
{ x: 2, y: 5, w: 2, h: 5, i: '7', static: false },
{ x: 4, y: 5, w: 2, h: 5, i: '8', static: false },
{ x: 6, y: 3, w: 2, h: 4, i: '9', static: true },
{ x: 8, y: 4, w: 2, h: 4, i: '10', static: false },
{ x: 10, y: 4, w: 2, h: 4, i: '11', static: false },
{ x: 0, y: 10, w: 2, h: 5, i: '12', static: false },
{ x: 2, y: 10, w: 2, h: 5, i: '13', static: false },
{ x: 4, y: 8, w: 2, h: 4, i: '14', static: false },
{ x: 6, y: 8, w: 2, h: 4, i: '15', static: false },
{ x: 8, y: 10, w: 2, h: 5, i: '16', static: false },
{ x: 10, y: 4, w: 2, h: 2, i: '17', static: false },
{ x: 0, y: 9, w: 2, h: 3, i: '18', static: false },
{ x: 2, y: 6, w: 2, h: 2, i: '19', static: false },
])
</script>

布局 Layout 的类型定义如下,它是由 LayoutItem 的数组组成,而 LayoutItem 的必须字段有 whxyi,分别表示 X坐标Y坐标索引(id)grid-layout-plus 默认把一行分为 col-num (默认 12)个元素份,每份高度row-height (默认 150 像素),而 whxy 传的值是占据了多少份,而不是像素。

1
2
3
4
5
6
7
8
9
10
11
12
13
14
15
16
17
18
19
20
export interface LayoutItemRequired {
w: number,
h: number,
x: number,
y: number,
i: number | string
}

export interface LayoutItem extends LayoutItemRequired {
minW?: number,
minH?: number,
maxW?: number,
maxH?: number,
moved?: boolean,
static?: boolean,
isDraggable?: boolean,
isResizable?: boolean
}

export type Layout = Array<LayoutItem>

此时的效果可以点这里

组件结构

grid-layout-plus 的核心组件就2个 grid-layoutgrid-itemgrid-layout是一个容器,用来计算网格布局;grid-item是拖动组件,内部使用 interact.js 来实现拖动和调整大小。

grid-layout 的基础结构如下:

1
2
3
4
5
6
7
8
9
10
11
12
13
14
15
16
17
18
19
20
21
22
23
24
25
26
27
28
29
30
31
32
33
34
35
36
37
38
39
40
41
42
43
44
<script setup lang="ts">
// ... 其他代码

const state = reactive({
width: -1,
mergedStyle: {},
lastLayoutLength: 0,
isDragging: false,
placeholder: {
x: 0,
y: 0,
w: 0,
h: 0,
i: '' as number | string,
},
layouts: {} as Record<Breakpoint, Layout>, // array to store all layouts from different breakpoints
lastBreakpoint: null as Breakpoint | null, // store last active breakpoint
originalLayout: null! as Layout, // store original Layout
})

const wrapper = ref<HTMLElement>()

// ... 其他代码
</script>

<template>
<div ref="wrapper" class="vgl-layout" :style="state.mergedStyle">
<slot v-if="$slots.default"></slot>
<template v-else>
<GridItem v-for="item in currentLayout" :key="item.i" v-bind="item">
<slot name="item" :item="item"></slot>
</GridItem>
</template>
<GridItem
v-show="state.isDragging"
class="vgl-item--placeholder"
:x="state.placeholder.x"
:y="state.placeholder.y"
:w="state.placeholder.w"
:h="state.placeholder.h"
:i="state.placeholder.i"
></GridItem>
</div>
</template>

从上可以看到,如果没有默认插槽的话,grid-layout-plus 会使用 GridItem 组件来渲染布局。此外在 idDragging 的时候会渲染 placeholder

grid-item 的基础结构如下:

1
2
3
4
5
6
7
8
9
10
11
12
13
14
15
16
17
18
19
20
21
22
23
24
25
26
27
28
29
30
31
32
33
34
35
36
37
38
39
40
41
42
43
44
45
46
47
48
49
50
51
52
53
54
55
56
57
58
59
60
61
62
63
64
65
66
67
68
69
70
71
72
73
74
75
76
77
<script setup lang="ts">
// ... 其他代码
const wrapper = ref<HTMLElement>()
const resizableAndNotStatic = computed(() => state.resizable && !props.static)

function tryInteract() {
if (!interactObj.value && wrapper.value) {
interactObj.value = interact(wrapper.value)
if (!state.useStyleCursor) {
interactObj.value.styleCursor(false)
}
}
}

const throttleDrag = throttle(handleDrag)

function tryMakeDraggable() {
tryInteract()

if (!interactObj.value) return

if (state.draggable && !props.static) {
const opts = {
ignoreFrom: props.dragIgnoreFrom,
allowFrom: props.dragAllowFrom,
...props.dragOption,
}
interactObj.value.draggable(opts)

if (!dragEventSet) {
dragEventSet = true
interactObj.value.on('dragstart dragmove dragend', event => {
// dragmove 触发比较多 使用节流函数
event.type === 'dragmove' ? throttleDrag(event) : handleDrag(event)
})
}
} else {
interactObj.value.draggable({ enabled: false })
}
}

const throttleResize = throttle(handleResize)

function tryMakeResizable() {
tryInteract()

if (!interactObj.value) return

if (state.resizable && !props.static) {
const maximum = calcPosition(0, 0, props.maxW, props.maxH)
const minimum = calcPosition(0, 0, props.minW, props.minH)

const opts: Record<string, any> = {
// ... 其他配置项
...props.resizeOption,
}

interactObj.value.resizable(opts)
interactObj.value.on('resizestart resizemove resizeend', event => {
// resizemove 触发比较多 使用节流函数
event.type === 'resizemove' ? throttleResize(event) : handleResize(event)
})

} else {
interactObj.value.resizable({ enabled: false })
}
}

// ... 其他代码
</script>

<template>
<section ref="wrapper" :class="className" :style="state.style">
<slot></slot>
<span v-if="resizableAndNotStatic" :class="resizerClass"></span>
</section>
</template>

由上可见,grid-item 组件调用 tryMakeDraggabletryMakeResizable 函数通过 interact.js 来分别实现拖动和调整大小的功能。

组件通信

grid-layoutgrid-item 数据通信部分是通过 props 来实现的,这一点可以在上述 grid-layout 组件中 #item 插槽中的 v-bind="item" 来知晓。还有一部分通信方式是通过 inject 来实现的,代码如下。

1
2
3
4
5
6
7
8
9
10
11
12
13
14
15
16
17
18
19
20
21
22
23
24
25
26
27
28
29
30
31
32
33
34
35
36
37
38
39
40
41
42
43
44
45
46
47
48
49
50
51
52
53
54
55
56
57
58
59
// src\helpers\common.ts
export const LAYOUT_KEY = Symbol('LAYOUT_KEY') as InjectionKey<LayoutInstance>
export const EMITTER_KEY = Symbol('EMITTER_KEY') as InjectionKey<EventEmitter>

// src\components\grid-layout.vue
const emitter = createEventEmitter()

provide(
LAYOUT_KEY,
reactive({
...toRefs(props),
...toRefs(state),
increaseItem,
decreaseItem,
}) as LayoutInstance,
)

provide(EMITTER_KEY, emitter)

watch(
() => props.isDraggable,
value => {
emitter.emit('setDraggable', value)
},
)

// src\components\grid-item.vue
const layout = inject(LAYOUT_KEY)
const emitter = inject(EMITTER_KEY)!

layout.increaseItem(instance)

function setDraggableHandler(isDraggable: boolean) {
if (isNull(props.isDraggable)) {
state.draggable = isDraggable
}
}

onMounted(() => {
// ... 其他代码
emitter.on('compact', compactHandler)
emitter.on('setDraggable', setDraggableHandler)
emitter.on('setResizable', setResizableHandler)
})

onBeforeUnmount(() => {

emitter.off('compact', compactHandler)
emitter.off('setDraggable', setDraggableHandler)
emitter.off('setResizable', setResizableHandler)
// ... 其他代码

if (interactObj.value) {
interactObj.value.unset()
interactObj.value = null
}

layout.decreaseItem(instance)
})

grid-layout 把自己的 propsstate 以及 emitter 提供给 grid-item 组件使用。通过 inject 方式不但可以直接获取到 grid-layout 的所有状态,还可以拿 emitter 来触发的事件,哪怕 grid-layoutgrid-item 隔了好几个组件,依然可以正常运行。

我们以 setDraggable 事件为例来讲解,当 grid-layoutprops.isDraggable 发生变化时,grid-layout 会通过 emitter 触发 setDraggable 事件,grid-item 组件监听 setDraggable 事件,调用 setDraggableHandler 函数来处理。这里 grid-item 首先会判断 props.isDraggable ,如果为空的话则根据 grid-layoutprops.isDraggable 来判断是否可以拖动。也就是说自己组件的 props 的优先级大于 grid-layoutprops,这就可以保证 grid-item 在拖动上做到个性化,即使 grid-layout 不支持拖动,也可以自己设置 props.isDraggable 来支持单个 grid-item 拖动。

上述 increaseItemdecreaseItem 是在 grid-item 把自己的实例添加到 grid-layout 中了,这样 grid-layout 暴露给外界的 getItem 方法就可以获取到子组件中的信息了,不过这里本章无需关注。

grid-item 处理 resize 和 drag

grid-item 中,tryMakeResizable 方法,通过 interact.js 的回调函数调用 handleResize 函数来处理调整大小的逻辑。

1
2
3
4
5
6
7
8
9
10
11
12
13
14
15
16
17
18
19
20
21
22
23
24
25
26
27
28
29
30
31
32
33
34
35
36
37
38
39
40
41
42
43
44
45
46
47
48
49
50
51
52
53
54
55
56
57
58
59
60
61
62
63
64
65
66
67
68
69
70
71
72
73
74
75
76
77
78
79
80
81
82
83
84
85
86
87
88
89
90
91
92
93
94
95
96
97
98
99
100
101
102
103
104
105
106
let innerX = props.x
let innerY = props.y
let innerW = props.w
let innerH = props.h

function handleResize(event: MouseEvent & { edges: any }) {
if (props.static) return

const type = event.type

// 排除异常场景
if (
(type === 'resizestart' && state.isResizing) ||
(type !== 'resizestart' && !state.isResizing)
) {
return
}

// 获取x、y坐标的像素值
const position = getControlPosition(event)
// Get the current drag point from the event. This is used as the offset.
if (isNull(position)) return // not possible but satisfies flow

const { x, y } = position
const newSize = { width: 0, height: 0 }
let pos
switch (type) {
case 'resizestart': {
tryMakeResizable()
previousW = innerW
previousH = innerH
// 计算像素值
pos = calcPosition(innerX, innerY, innerW, innerH)
newSize.width = pos.width
newSize.height = pos.height
// 记录初始大小
state.resizing = newSize
state.isResizing = true
break
}
case 'resizemove': {
// A vertical resize ignores the horizontal delta
if (!event.edges.right && !event.edges.left) {
lastW = x
}

// An horizontal resize ignores the vertical delta
if (!event.edges.top && !event.edges.bottom) {
lastH = y
}

const coreEvent = createCoreData(lastW, lastH, x, y)
if (renderRtl.value) {
newSize.width = state.resizing.width - coreEvent.deltaX / state.transformScale
} else {
newSize.width = state.resizing.width + coreEvent.deltaX / state.transformScale
}
newSize.height = state.resizing.height + coreEvent.deltaY / state.transformScale
// 更新坐标
state.resizing = newSize
break
}
case 'resizeend': {
pos = calcPosition(innerX, innerY, innerW, innerH)
newSize.width = pos.width
newSize.height = pos.height

state.resizing = { width: -1, height: -1 }
state.isResizing = false
break
}
}

// Get new WH
pos = calcWH(newSize.height, newSize.width)
if (pos.w < props.minW) {
pos.w = props.minW
}
if (pos.w > props.maxW) {
pos.w = props.maxW
}
if (pos.h < props.minH) {
pos.h = props.minH
}
if (pos.h > props.maxH) {
pos.h = props.maxH
}

if (pos.h < 1) {
pos.h = 1
}
if (pos.w < 1) {
pos.w = 1
}

lastW = x
lastH = y

if (innerW !== pos.w || innerH !== pos.h) {
emit('resize', props.i, pos.h, pos.w, newSize.height, newSize.width)
}
if (event.type === 'resizeend' && (previousW !== innerW || previousH !== innerH)) {
emit('resized', props.i, pos.h, pos.w, newSize.height, newSize.width)
}
emitter.emit('resizeEvent', event.type, props.i, innerX, innerY, pos.h, pos.w)
}

handleResize 通过 state.resizing 对象来保存 resize 过程中当前 grid-item 的宽高, state.isResizing 来记录是否处于移动过程中,这两个值后面还会用到。然后通过新的宽高计算出新的 wh(份数), 当然把它们限制在最小和最大范围内,最小是 1。最后通过 props 暴露 resizeresized 事件,再通过 emitter 触发 resizeEvent 事件,告诉 grid-layout 组件当前 grid-item 的大小已经改变了。

handleDrag 的处理与 handleResize 类型,只不过 handleResize 修改的是 grid-item 的宽高,而 handleDrag 修改的是grid-item 的位置,具体代码如下:

1
2
3
4
5
6
7
8
9
10
11
12
13
14
15
16
17
18
19
20
21
22
23
24
25
26
27
28
29
30
31
32
33
34
35
36
37
38
39
40
41
42
43
44
45
46
47
48
49
50
51
52
53
54
55
56
57
58
59
60
61
62
63
64
65
66
67
68
69
70
71
72
73
74
75
76
77
78
79
80
81
82
83
84
85
86
87
88
89
90
91
92
93
94
95
96
97
98
99
100
101
102
103
104
105
106
107
108
109
110
function handleDrag(event: MouseEvent) {
if (props.static || state.isResizing) return

const type = event.type
if ((type === 'dragstart' && state.isDragging) || (type !== 'dragstart' && !state.isDragging)) {
return
}

const position = getControlPosition(event)

// Get the current drag point from the event. This is used as the offset.
if (isNull(position)) return // not possible but satisfies flow
const { x, y } = position
const target = event.target as HTMLElement

if (!target.offsetParent) return

// let shouldUpdate = false;
const newPosition = { top: 0, left: 0 }
switch (type) {
case 'dragstart': {
previousX = innerX
previousY = innerY

const parentRect = target.offsetParent.getBoundingClientRect()
const clientRect = target.getBoundingClientRect()

const cLeft = clientRect.left / state.transformScale
const pLeft = parentRect.left / state.transformScale
const cRight = clientRect.right / state.transformScale
const pRight = parentRect.right / state.transformScale
const cTop = clientRect.top / state.transformScale
const pTop = parentRect.top / state.transformScale

if (renderRtl.value) {
newPosition.left = (cRight - pRight) * -1
} else {
newPosition.left = cLeft - pLeft
}
newPosition.top = cTop - pTop
state.dragging = newPosition
state.isDragging = true
break
}
case 'dragmove': {
const coreEvent = createCoreData(lastX, lastY, x, y)
// Add rtl support
if (renderRtl.value) {
newPosition.left = state.dragging.left - coreEvent.deltaX / state.transformScale
} else {
newPosition.left = state.dragging.left + coreEvent.deltaX / state.transformScale
}
newPosition.top = state.dragging.top + coreEvent.deltaY / state.transformScale
if (state.bounded) {
const bottomBoundary =
target.offsetParent.clientHeight -
calcGridItemWHPx(props.h, state.rowHeight, state.margin[1])
newPosition.top = clamp(newPosition.top, 0, bottomBoundary)
const colWidth = calcColWidth()
const rightBoundary =
state.containerWidth - calcGridItemWHPx(props.w, colWidth, state.margin[0])
newPosition.left = clamp(newPosition.left, 0, rightBoundary)
}

state.dragging = newPosition
break
}
case 'dragend': {
const parentRect = target.offsetParent.getBoundingClientRect()
const clientRect = target.getBoundingClientRect()

const cLeft = clientRect.left / state.transformScale
const pLeft = parentRect.left / state.transformScale
const cRight = clientRect.right / state.transformScale
const pRight = parentRect.right / state.transformScale
const cTop = clientRect.top / state.transformScale
const pTop = parentRect.top / state.transformScale

// Add rtl support
if (renderRtl.value) {
newPosition.left = (cRight - pRight) * -1
} else {
newPosition.left = cLeft - pLeft
}
newPosition.top = cTop - pTop
state.dragging = { top: -1, left: -1 }
state.isDragging = false
break
}
}

// Get new XY
let pos
if (renderRtl.value) {
pos = calcXY(newPosition.top, newPosition.left)
} else {
pos = calcXY(newPosition.top, newPosition.left)
}

lastX = x
lastY = y

if (innerX !== pos.x || innerY !== pos.y) {
emit('move', props.i, pos.x, pos.y)
}
if (event.type === 'dragend' && (previousX !== innerX || previousY !== innerY)) {
emit('moved', props.i, pos.x, pos.y)
}
emitter.emit('dragEvent', event.type, props.i, pos.x, pos.y, innerH, innerW)
}

handleDrag 中通过 state.dragging 记录位置信息(topleft),当然这里还支持 rtl。最后通过 emitter 触发 dragEvent 事件,告诉 grid-layout 组件当前 grid-item 的移动了。

综上,handleResizehandleDrag 就是计算出新的宽高或位置,并告诉 grid-layout 变化信息。

grid-layout 处理 resize 和 drag

grid-item 宽高或者位置变化的时候,就会影响到其他 grid-item 位置的变化,这里就需要在 grid-layout 处理其他grid-item 的位置信息。

1
2
3
4
5
6
7
8
9
10
11
12
13
14
15
16
17
18
19
20
21
22
23
24
25
// src\components\grid-layout.vue
emitter.on('resizeEvent', resizeEventHandler)
emitter.on('dragEvent', dragEventHandler)

function resizeEventHandler(
eventType: string,
i: number | string,
x: number,
y: number,
h: number,
w: number,
) {
resizeEvent(eventType, i, x, y, h, w)
}

function dragEventHandler(
eventType: string,
i: number | string,
x: number,
y: number,
h: number,
w: number,
) {
dragEvent(eventType, i, x, y, h, w)
}

grid-layout 中最重要的两个函数就是 resizeEventdragEvent 函数。我们先看 resizeEvent

1
2
3
4
5
6
7
8
9
10
11
12
13
14
15
16
17
18
19
20
21
22
23
24
25
26
27
28
29
30
31
32
33
34
35
36
37
38
39
40
41
42
43
44
45
46
47
48
49
50
51
52
53
54
55
56
57
58
59
60
61
62
63
64
65
66
67
68
69
function resizeEvent(
eventName: string | undefined,
id: number | string,
x: number,
y: number,
h: number,
w: number,
) {
// 先根据 id 找到对应 grid-item
let l = getLayoutItem(currentLayout.value, id)!
// GetLayoutItem sometimes return null object
if (isNull(l)) {
l = { h: 0, w: 0, x: 0, y: 0, i: '' }
}

let hasCollisions
// 如果设置 preventCollision 为 true 的时候则拖拽 grid-item 只能放在空白区域
if (props.preventCollision) {
const collisions = getAllCollisions(currentLayout.value, { ...l, w, h }).filter(
layoutItem => layoutItem.i !== l.i,
)
hasCollisions = collisions.length > 0

// If we're colliding, we need adjust the placeholder.
if (hasCollisions) {
// adjust w && h to maximum allowed space
let leastX = Infinity
let leastY = Infinity
collisions.forEach(layoutItem => {
if (layoutItem.x > l.x) leastX = Math.min(leastX, layoutItem.x)
if (layoutItem.y > l.y) leastY = Math.min(leastY, layoutItem.y)
})

if (Number.isFinite(leastX)) l.w = leastX - l.x
if (Number.isFinite(leastY)) l.h = leastY - l.y
}
}

if (!hasCollisions) {
// Set new width and height.
l.w = w
l.h = h
}

if (eventName === 'resizestart' || eventName === 'resizemove') {
state.placeholder.i = id
state.placeholder.x = x
state.placeholder.y = y
state.placeholder.w = l.w
state.placeholder.h = l.h
nextTick(() => {
state.isDragging = true
})
// this.$broadcast("updateWidth", this.width);
emitter.emit('updateWidth', state.width)
} else if (eventName) {
nextTick(() => {
state.isDragging = false
})
}

if (props.responsive) responsiveGridLayout()

compact(currentLayout.value, props.verticalCompact)
emitter.emit('compact')
updateHeight()

if (eventName === 'resizeend') emit('layout-updated', currentLayout.value)
}

resizeEvent 的主要功能有修改 placeholder 的宽高和位置和显示,当设置 state.isDragging = true 的时候则显示 placeholder (可以在上面 组件结构 中看到相关代码);如果设置了 responsive 则处理响应式布局;然后收缩布局并触发事件。compact 方法是 grid-layout 的核心算法,稍后我们再讲。触发 emitter.emit('compact') 则通知 grid-item 重新渲染。这个流程起初是在 grid-item 通知到 grid-layout 现在又回到 grid-item 了,当然这里通知的是所有的 grid-item

dragEventresizeEvent 的代码也是大同小异。

1
2
3
4
5
6
7
8
9
10
11
12
13
14
15
16
17
18
19
20
21
22
23
24
25
26
27
28
29
30
31
32
33
34
35
36
37
38
39
40
41
42
43
44
45
46
47
48
49
50
51
52
53
54
55
56
57
58
59
60
61
62
63
64
function dragEvent(
eventName: string,
id: number | string,
x: number,
y: number,
h: number,
w: number,
) {
let l = getLayoutItem(currentLayout.value, id)!

// GetLayoutItem sometimes returns null object
if (isNull(l)) {
l = { h: 0, w: 0, x: 0, y: 0, i: '' }
}

if (eventName === 'dragstart' && !props.verticalCompact) {
positionsBeforeDrag = currentLayout.value.reduce(
(result, { i, x, y }) => ({
...result,
[i]: { x, y },
}),
{},
)
}

if (eventName === 'dragmove' || eventName === 'dragstart') {
state.placeholder.i = id
state.placeholder.x = l.x
state.placeholder.y = l.y
state.placeholder.w = w
state.placeholder.h = h

nextTick(() => {
state.isDragging = true
})

emitter.emit('updateWidth', state.width)
} else {
nextTick(() => {
state.isDragging = false
})
}

// Move the element to the dragged location.
currentLayout.value = moveElement(currentLayout.value, l, x, y, true, props.preventCollision)

if (props.restoreOnDrag) {
// Do not compact items more than in layout before drag
// Set moved item as static to avoid to compact it
l.static = true
compact(currentLayout.value, props.verticalCompact, positionsBeforeDrag)
l.static = false
} else {
compact(currentLayout.value, props.verticalCompact)
}

// needed because vue can't detect changes on array element properties
emitter.emit('compact')
updateHeight()
if (eventName === 'dragend') {
positionsBeforeDrag = undefined
emit('layout-updated', currentLayout.value)
}
}

dragEventresizeEvent 最大的不同是调用了 moveElement 方法。resize 的时候影响的是当前 grit-item 的宽高,同时会影响右侧和下方的元素 y 值变化,这个过程的逻辑在 compact 函数里面,作用是消除空白区域使其紧凑。但是 drag 的时候修改的是位置,位置一变化,甚至会导致上面的元素挪到当前移动元素的下方,也就是换位,这就有了 moveElement 方法。

1
2
3
4
5
6
7
8
9
10
11
12
13
14
15
16
17
18
19
20
21
22
23
24
25
26
27
28
29
30
31
32
33
34
35
36
37
38
39
40
41
42
43
44
45
46
47
48
49
50
51
52
53
54
55
56
57
58
59
60
61
62
63
64
65
66
67
68
69
70
71
72
73
/**
* Move an element. Responsible for doing cascading movements of other elements.
*
* @param layout Full layout to modify.
* @param layoutItem element to move.
* @param x X position in grid units.
* @param y Y position in grid units.
* @param isUserAction If true, designates that the item we're moving is
* being dragged/resized by th euser.
*/
export function moveElement(
layout: Layout,
layoutItem: LayoutItem,
x?: number,
y?: number,
isUserAction = false,
preventCollision = false,
): Layout {
// 静态的不能移动,所以不做处理,直接返回布局
if (layoutItem.static) return layout

// 记录旧的值
const oldX = layoutItem.x
const oldY = layoutItem.y

// y 越大越在下面 这里当前y大于目的地y 表示向上移动
const movingUp = y && layoutItem.y > y
// This is quite a bit faster than extending the object
// 有值的时候才赋值 后面传 undefined 的时候 则不赋值
if (typeof x === 'number') layoutItem.x = x
if (typeof y === 'number') layoutItem.y = y
// 标记移动
layoutItem.moved = true

// If this collides with anything, move it.
// When doing this comparison, we have to sort the items we compare with
// to ensure, in the case of multiple collisions, that we're getting the
// nearest collision.
let sorted = sortLayoutItemsByRowCol(layout)
if (movingUp) sorted = sorted.reverse()
// 获取所有碰撞的 grid-item 数据
const collisions = getAllCollisions(sorted, layoutItem)

// preventCollision为true 则不处理碰撞 赋值之前的值就行
if (preventCollision && collisions.length) {
layoutItem.x = oldX
layoutItem.y = oldY
layoutItem.moved = false
return layout
}

// Move each item that collides away from this element.
// 处理级联移动
for (let i = 0, len = collisions.length; i < len; i++) {
const collision = collisions[i]

// Short circuit so we can't infinite loop
if (collision.moved) continue

// This makes it feel a bit more precise by waiting to swap for just a bit when moving up.
// 移动到大于碰撞元素高度的1/4前不处理
if (layoutItem.y > collision.y && layoutItem.y - collision.y > collision.h / 4) continue

// Don't move static items - we have to move *this* element away
if (collision.static) {
layout = moveElementAwayFromCollision(layout, collision, layoutItem, isUserAction)
} else {
layout = moveElementAwayFromCollision(layout, layoutItem, collision, isUserAction)
}
}

return layout
}

moveElement 中,对当前元素的移动通过给 xy 坐标赋值来实现。然后遍历所有碰撞的元素,来做级联移动。在 moveElementAwayFromCollision 中第二个参数是碰撞的不动的元素,第三个参数是要移动的参数,如果 collision.statictrue 的时候,则collision不动,移动当前元素;否则当前元素不动,移动碰撞的元素,这里很巧妙地通过参数的位置就实现了静态碰撞元素的处理。

1
2
3
4
5
6
7
8
9
10
11
12
13
14
15
16
17
18
19
20
21
22
23
24
25
26
27
28
29
30
31
32
33
34
35
36
37
38
39
/**
* This is where the magic needs to happen - given a collision, move an element away from the collision.
* We attempt to move it up if there's room, otherwise it goes below.
*
* @param layout Full layout to modify.
* @param collidesWith Layout item we're colliding with.
* @param itemToMove Layout item we're moving.
* @param isUserAction If true, designates that the item we're moving is being dragged/resized
* by the user.
*/
export function moveElementAwayFromCollision(
layout: Layout,
collidesWith: LayoutItem,
itemToMove: LayoutItem,
isUserAction?: boolean,
): Layout {
const preventCollision = false // we're already colliding
// If there is enough space above the collision to put this element, move it there.
// We only do this on the main collision as this can get funky in cascades and cause
// unwanted swapping behavior.
if (isUserAction) {
// Make a mock item so we don't modify the item here, only modify in moveElement.
const fakeItem: LayoutItem = {
x: itemToMove.x,
y: itemToMove.y,
w: itemToMove.w,
h: itemToMove.h,
i: '-1',
}
fakeItem.y = Math.max(collidesWith.y - itemToMove.h, 0)
if (!getFirstCollision(layout, fakeItem)) {
return moveElement(layout, itemToMove, undefined, fakeItem.y, preventCollision)
}
}

// Previously this was optimized to move below the collision directly, but this can cause problems
// with cascading moves, as an item may actually leapflog a collision and cause a reversal in order.
return moveElement(layout, itemToMove, undefined, itemToMove.y + 1, preventCollision)
}

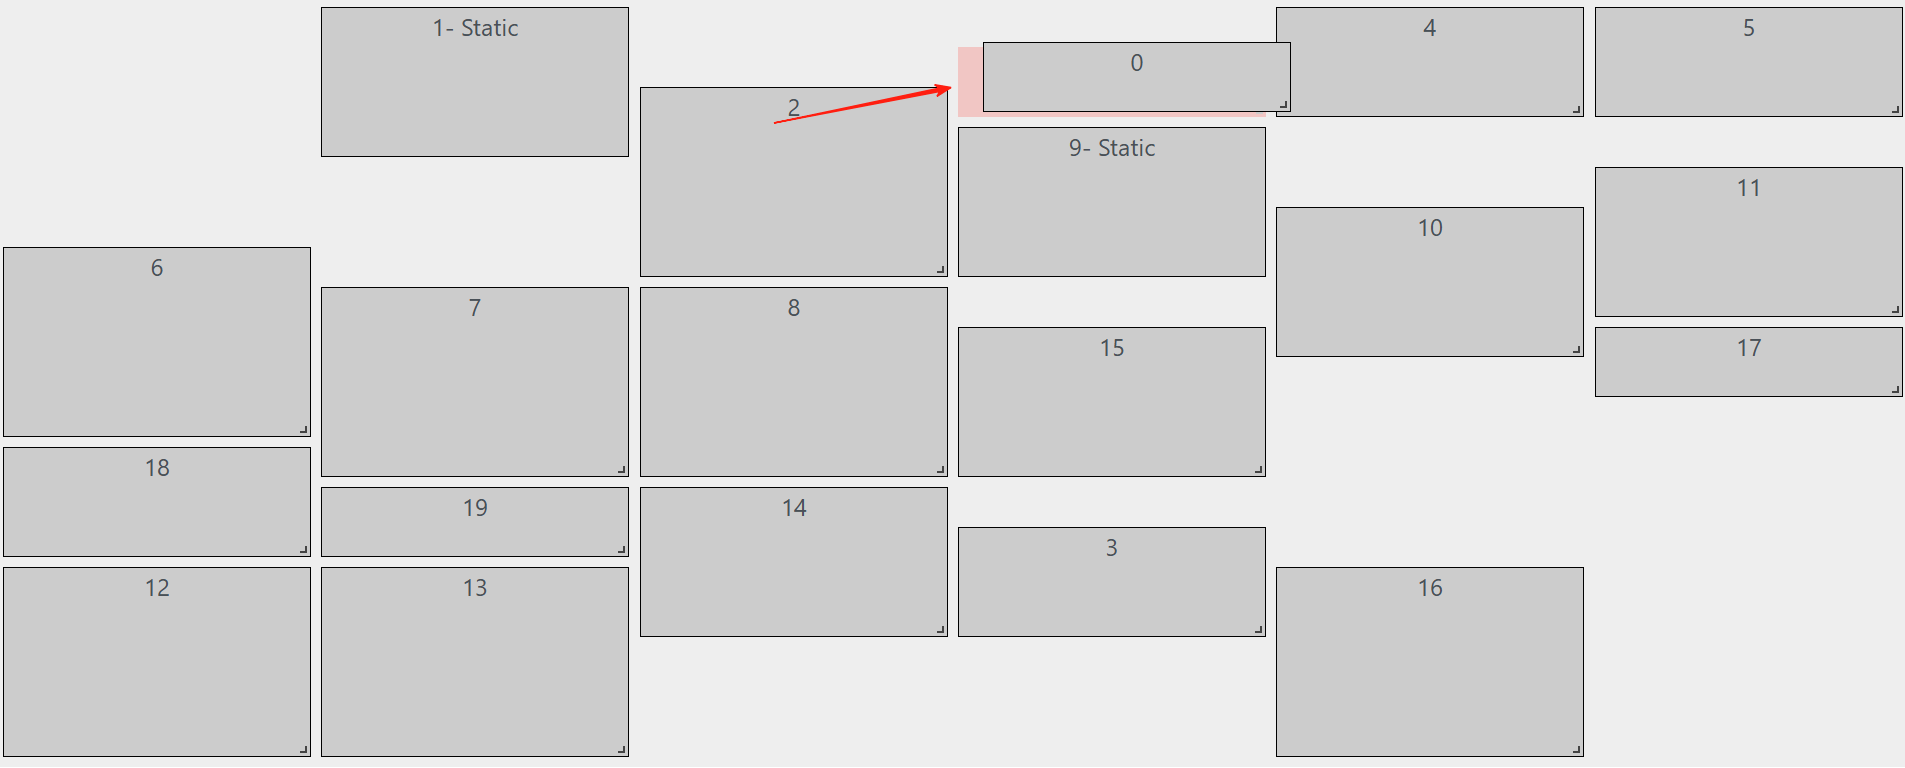
moveElementAwayFromCollision 中如果是用户手动操作,则把目标移动到 collidesWith.y - itemToMove.h 位置,这样目标与 collidesWith 刚好不碰撞。当然需要调用 getFirstCollision 检测一下,没碰撞就移动到这个位置,如果碰撞了则往下移动一格。之后调用 moveElement ,由于碰撞的 item 向下移动了一格,又会引发它下面的项目级联移动,直到所有元素都没发生碰撞。

如果对移动到 collidesWith.y - itemToMove.h 位置不理解,可以看下图,0 放在某个静态块的上面,如果 vertical-compactpropsfalse 时,就应该刚好放在静态块的上面;当然如果为 true 则后面的 compact 函数会把它处理在最顶部。

插入到某个静态块的上面

compact 实现

compact 方法是使得所有元素变得紧凑。在介绍 compact 前先看几个辅助方法:

1
2
3
4
5
6
7
8
9
10
11
12
13
14
15
16
17
18
19
20
21
22
23
24
25
26
27
28
29
30
31
32
33
34
35
36
37
38
39
40
41
42
43
44
45
46
47
48
49
50
51
52
53
54
55
56
57
58
59
60
61
62
63
64
/**
* Given two layoutitems, check if they collide.
* 判断两个元素是否碰撞
*
* @return True if colliding.
*/
export function collides(l1: LayoutItem, l2: LayoutItem): boolean {
if (l1 === l2) return false // same element
if (l1.x + l1.w <= l2.x) return false // l1 is left of l2
if (l1.x >= l2.x + l2.w) return false // l1 is right of l2
if (l1.y + l1.h <= l2.y) return false // l1 is above l2
if (l1.y >= l2.y + l2.h) return false // l1 is below l2
return true // boxes overlap
}


/**
* Returns the first item this layout collides with.
* It doesn't appear to matter which order we approach this from, although
* perhaps that is the wrong thing to do.
* 查找第一个碰撞的元素
*
* @param {Object} layoutItem Layout item.
* @return {Object|undefined} A colliding layout item, or undefined.
*/
export function getFirstCollision(layout: Layout, layoutItem: LayoutItem): LayoutItem | undefined {
for (let i = 0, len = layout.length; i < len; i++) {
if (collides(layout[i], layoutItem)) return layout[i]
}
}

// 获取所有碰撞的元素
export function getAllCollisions(layout: Layout, layoutItem: LayoutItem): Array<LayoutItem> {
return layout.filter(l => collides(l, layoutItem))
}

/**
* Get all static elements.
* 获取所有静态元素
* @param layout Array of layout objects.
* @return Array of static layout items..
*/
export function getStatics(layout: Layout): Array<LayoutItem> {
return layout.filter(l => l.static)
}

/**
* Get layout items sorted from top left to right and down.
*
* @return Layout, sorted static items first.
*/
export function sortLayoutItemsByRowCol(layout: Layout): Layout {
return Array.from(layout).sort(function (a, b) {
if (a.y === b.y && a.x === b.x) {
return 0
}

if (a.y > b.y || (a.y === b.y && a.x > b.x)) {
return 1
}

return -1
})
}

这些方法整体比较简单,我们再看 compact 方法:

1
2
3
4
5
6
7
8
9
10
11
12
13
14
15
16
17
18
19
20
21
22
23
24
25
26
27
28
29
30
31
32
33
34
35
36
37
38
/**
* Given a layout, compact it. This involves going down each y coordinate and removing gaps
* between items.
*
* @param layout Layout.
* @param verticalCompact Whether or not to compact the layout vertically.
* @param minPositions
* @return Compacted Layout.
*/
export function compact(layout: Layout, verticalCompact?: boolean, minPositions?: any): Layout {
// Statics go in the compareWith array right away so items flow around them.
const compareWith = getStatics(layout)
// We go through the items by row and column.
const sorted = sortLayoutItemsByRowCol(layout)
// Holding for new items.
const out: Layout = Array(layout.length)

for (let i = 0, len = sorted.length; i < len; i++) {
let l = sorted[i]

// Don't move static elements
if (!l.static) {
l = compactItem(compareWith, l, verticalCompact, minPositions)

// Add to comparison array. We only collide with items before this one.
// Statics are already in this array.
compareWith.push(l)
}

// Add to output array to make sure they still come out in the right order.
out[layout.findIndex(i => i.i === l.i)] = l

// Clear moved flag, if it exists.
l.moved = false
}

return out
}

compact 先获取所有静态的元素赋值给 compareWith 。然后排序,以保证遍历的顺序是从左往右,从上到下的。然后对排好序的元素进行遍历。对于非静态的处理后加入到 compareWith 中(静态的已经在里面了)。这样就可以先确认静态元素的位置,然后从左到右从上到下把没碰撞的元素加入进来。

把元素处理成没碰撞的位置代码如下:

1
2
3
4
5
6
7
8
9
10
11
12
13
14
15
16
17
18
19
20
21
22
23
24
25
26
27
28
/**
* Compact an item in the layout.
*/
export function compactItem(
compareWith: Layout,
l: LayoutItem,
verticalCompact?: boolean,
minPositions?: any,
): LayoutItem {
if (verticalCompact) {
// Move the element up as far as it can go without colliding.
while (l.y > 0 && !getFirstCollision(compareWith, l)) {
l.y--
}
} else if (minPositions) {
const minY = minPositions[l.i].y
while (l.y > minY && !getFirstCollision(compareWith, l)) {
l.y--
}
}

// Move it down, and keep moving it down if it's colliding.
let collides
while ((collides = getFirstCollision(compareWith, l))) {
l.y = collides.y + collides.h
}
return l
}

compactItem 中,verticalCompacttrue 的时候,则需要变的紧凑,变紧凑的过程是先把元素往上移动,移动到第一个发生碰撞的地方。当然如果一个元素上面是静态元素,那么向上移动肯定会碰撞的,所以向上移动后对于发生碰撞的元素还需要向下移动,直到不碰撞位置。这样在 compact 中遍历完所有排好序的元素,就会使所有元素变得紧凑。

grid-item 处理 compact 事件

还记得 grid-layout 无论是 dragEvent 还是 resizeEvent 在调用完 compact 方法都会调用 emitter.emit('compact') 吗?这是触发所有 grid-item 元素的 compact 事件,grid-item 中处理如下:

1
2
3
4
5
6
7
8
9
10
11
12
13
14
15
16
17
18
19
20
21
22
23
24
25
26
27
28
29
30
31
32
33
34
35
36
37
38
39
40
41
42
43
44
45
46
47
48
49
50
51
52
53
54
55
56
57
58
59
60
61
62
63
64
65
66
67
68
69
70
71
72
73
74
75
76
77
78
79
80
81
emitter.on('compact', compactHandler)

function compactHandler() {
compact()
}

function compact() {
createStyle()
}

function setTransform(top: number, left: number, width: number, height: number) {
// Replace unitless items with px
const translate = 'translate3d(' + left + 'px,' + top + 'px, 0)'
return {
transform: translate,
WebkitTransform: translate,
MozTransform: translate,
msTransform: translate,
OTransform: translate,
width: width + 'px',
height: height + 'px',
position: 'absolute',
}
}

function setTopLeft(top: number, left: number, width: number, height: number) {
return {
top: top + 'px',
left: left + 'px',
width: width + 'px',
height: height + 'px',
position: 'absolute',
}
}

function createStyle() {
if (props.x + props.w > state.cols) {
innerX = 0
innerW = props.w > state.cols ? state.cols : props.w
} else {
innerX = props.x
innerW = props.w
}

const pos = calcPosition(innerX, innerY, innerW, innerH)

if (state.isDragging) {
pos.top = state.dragging.top
// Add rtl support
if (renderRtl.value) {
pos.right = state.dragging.left
} else {
pos.left = state.dragging.left
}
}
if (state.isResizing) {
pos.width = state.resizing.width
pos.height = state.resizing.height
}

let style
// CSS Transforms support (default)
if (state.useCssTransforms) {
// Add rtl support
if (renderRtl.value) {
style = setTransformRtl(pos.top, pos.right!, pos.width, pos.height)
} else {
style = setTransform(pos.top, pos.left!, pos.width, pos.height)
}
} else {
// top,left (slow)
// Add rtl support
if (renderRtl.value) {
style = setTopRight(pos.top, pos.right!, pos.width, pos.height)
} else {
style = setTopLeft(pos.top, pos.left!, pos.width, pos.height)
}
}

state.style = style
}

createStyle 中先让 innerXinnerW 设置在一个合法的数值范围内,然后获取到位置信息 pos, 还记得之前的 state.draggingstate.resizing 吗?如果处于 drag / resize 过程中,则把对应的坐标给 pos。然后通过 useCssTransforms 来判断是使用 transform 还是 top/left 来设置位置。最后修改 state.style,在模版中对应的 grid-itemstyle 就会改变。

这就是 grid-layout-plus的核心流程,还有一些响应式等逻辑没有介绍,相信你也能看得懂对应的源码。

-------------本文结束 感谢您的阅读-------------
0%