Canvas系列(21):多边形碰撞检测

之前的文章我们做过写过一篇碰撞检测的文章,那篇文章中我们简绍了,圆与圆的碰撞检测,长方形与长方形的碰撞检测,以及圆与长方形的碰撞检测。本章我们来介绍多边形与多边形的碰撞检测。


多边形类结构

我们先定义一个多边形的类,方便以后操作。

1
2
3
4
5
6
7
8
9
10
11
12
13
14
15
16
17
18
19
20
21
22
23
24
25
26
27
28
29
30
31
32
33
34
35
36
37
38
39
40
41
42
43
44
45
46
47
48
49
50
51
52
53
54
55
56
class Polygon {
constructor(context, options = {}) {
this.context = context;
// 多边形顶点数组,每个顶点是一个包含 x 和 y 属性的对象
this.vertices = options.vertices || [];
this.color = options.color || '#000';
this.vx = options.vx || 0;
this.vy = options.vy || 0;
this.ax = options.ax || 0;
this.ay = options.ay || 0;
}

update() {
this.vx += this.ax;
this.vy += this.ay;
// 更新每个顶点的位置
for (let vertex of this.vertices) {
vertex.x += this.vx;
vertex.y += this.vy;
}
}

draw() {
this.context.save();
this.context.beginPath();
this.context.fillStyle = this.color;
// 移动到第一个顶点
if (this.vertices.length > 0) {
this.context.moveTo(this.vertices[0].x, this.vertices[0].y);
// 依次连接其他顶点
for (let i = 1; i < this.vertices.length; i++) {
this.context.lineTo(this.vertices[i].x, this.vertices[i].y);
}
// 闭合路径
this.context.closePath();
this.context.fill();
}
this.context.restore();
}

// TODO:判断点是否在多边形内
isContainsPoint(x, y) {

}

moveBy(dx, dy) {
for (let vertex of this.vertices) {
vertex.x += dx;
vertex.y += dy;
}
}

getVertices () {
return this.vertices;
}
}

通过上面类我们就可以创建多边形了,使用方式如下:
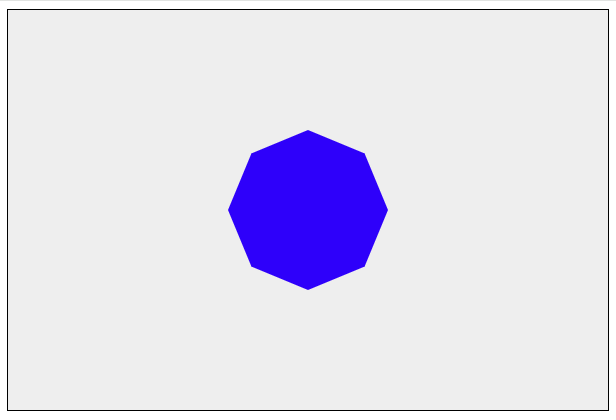
1
2
3
4
5
6
7
8
9
10
11
12
13
14
15
16
17
const centerX = canvas.width / 2;
const centerY = canvas.height / 2;
const radius = 80;
const numVertices = 8;
const angleStep = (Math.PI * 2) / numVertices;
const vertices = [];
for (let i = 0; i < numVertices; i++) {
const angle = i * angleStep;
const x = centerX + radius * Math.cos(angle);
const y = centerY + radius * Math.sin(angle);
vertices.push({ x, y });
}

let polygon = new Polygon(context, {
vertices,
color: 'blue'
});

我们在画布中央,绘制了一个蓝色的正八边形,效果如下

正八边形

上述代码中有一个 isContainsPoint 用来判断点是否在多边形内。那么如何判断一个点在多边形内呢?这里我们就用到了射线法。

射线法

射线法(Ray Casting Algorithm) 是一种判断点是否在多边形内部的经典算法,其原理是非零环绕规则。射线法核心逻辑可概括如下:

从目标点向任意方向(通常选择水平向右)发射一条射线,若射线与多边形边界的交点数量为奇数,则点在多边形内部;若为偶数(包括 0),则点在多边形外部。

在射线法中,从目标点发射出的射线的方向是任意的,但是为了计算方便我们一般选择水平向右。然后遍历每条边,记录边与射线的相交次数。这里其实我们只关注相交次数是奇数还是偶数,而不关注具体的次数。所以也可以用一个默认为 falseboolean 类型的变量来记录,如果相交则对其取反,最后值如果是 true 则点在多边形内部,否则在外部。当然这里还有一个问题,怎么判断射线与线段是否相交呢?

射线与线段相交

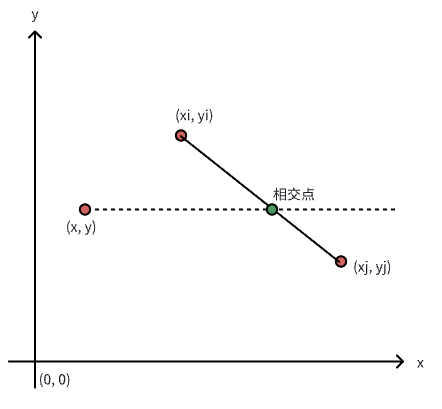
对于水平向右的射线来说,只需要满足2个条件则射线与线段相交。

条件 1:射线发出点的 y 坐标在边的两个端点 y 之间;
条件 2:射线与边的交点的 x 坐标,在射线发出点的右侧。

对于第一条来说,只要满足 yi > y > yj 或者 yi < y < yj 就行,也就是 yi > yyj > y 不相等。
对于第二条来说,先得求出交点的x坐标(交点的y坐标就是射线发出点的y左边),假设交点的x坐标用 x2 来表示,则根据相似三角形有 (xj - xi) / (yj - yi) = (x2 - xi) / (y - yi),可得 x2 = (xj - xi) * (y - yi) / (yj - yi) + xi。所以 x < x2 即可说明交点在射线发出点的右侧。具体代码如下:

1
2
3
4
5
6
7
8
9
10
11
12
13
14
15
16
17
18
19
20
21
class Polygon {
// ... 其他代码

// 使用射线法判断点是否在多边形内
isContainsPoint(x, y) {
let inside = false;
// j是上一个端点的索引,刚开始j是最后一个点
for (let i = 0, j = this.vertices.length - 1; i < this.vertices.length; j = i++) {
const xi = this.vertices[i].x, yi = this.vertices[i].y;
const xj = this.vertices[j].x, yj = this.vertices[j].y;

const intersect = ((yi > y) !== (yj > y)) &&
(x < (xj - xi) * (y - yi) / (yj - yi) + xi);
if (intersect) inside = !inside;
}
return inside;
}

// ... 其他代码

}

有了 isContainsPoint 方法我们就可以给多边形添加拖拽了。

1
2
3
4
5
6
7
8
9
10
11
12
13
14
15
16
17
18
19
20
21
22
23
24
25
26
27
28
29
30
31
32
33
34
35
let mouse = captureMouse(canvas);
let selectedObj = null;

canvas.addEventListener('mousedown', () => {
let startX = mouse.x;
let startY = mouse.y;
if (polygon.isContainsPoint(mouse.x, mouse.y)) {
selectedObj = polygon;
}

if (selectedObj) {
// 添加事件来模拟拖拽
canvas.addEventListener('mousemove', onMouseMove, false);
canvas.addEventListener('mouseup', onMouseUp, false);
return true;
}

function onMouseMove () {
const dx = mouse.x - startX;
const dy = mouse.y - startY;

selectedObj.moveBy(dx, dy);

// 更新起始位置
startX = mouse.x;
startY = mouse.y;
}

function onMouseUp () {
selectedObj = null;
// 清除事件
canvas.removeEventListener('mousemove', onMouseMove, false);
canvas.removeEventListener('mouseup', onMouseUp, false);
}
}, false);

captureMouse() 函数参考这里

此时效果如下

射线法

分离轴定理

现在回归我们的主题,我们的主题是多边形的碰撞检测。多边形的碰撞检测其实有好多种算法,比较经典的就是分离轴定理。著名的2D物理引擎 matter.js 的碰撞检测就是采用分离轴定理(SAT)。

分离轴定理(Separating Axis Theorem,简称 SAT) 是计算机图形学、物理引擎和碰撞检测领域中一个极其重要且基础性的原理,主要用于判断两个凸多边形或凸多面体之间是否发生碰撞(相交)。我们这里是二维的所以就是凸多边形,凹多边形不可以直接使用分离轴定理,但可以切割成多个凸多边形,然后使用分离轴定理。分离轴定理的核心内容是:

如果两个凸体(凸多边形或凸多面体)没有发生碰撞,那么必定存在一条直线(在 2D 中)或一个平面(在 3D 中),能够将这两个物体完全分隔开。这条直线或平面的法线方向,就称为分离轴。

上面这句话也好理解,如果两个凸多边形(凸多面体)没有发生碰撞,那么必定存在一条直线(一个平面),能够将这两个凸多边形(凸多面体)分隔开。

根据分离轴定理的逆否命题,我们可以得到一个用于碰撞检测的充分必要条件:

两个凸体(凸多边形或凸多面体)相交(碰撞),当且仅当两个凸体在所有的分离轴上的投影区间相交。如果存在在分离轴上的投影不相交的情况则不发生相交(碰撞)。

分离轴示意

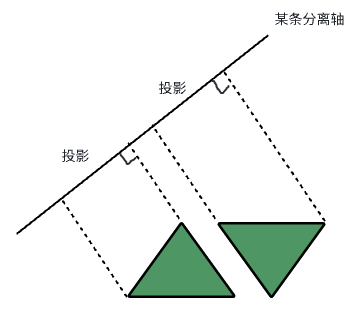
如图所示,两个多变形(三角形)和一条分离轴,多边形在分离轴上的投屏没有重合,则说明两个多边形没有发生碰撞。聪明的你此刻应该会挑选分离轴了,图中的是垂直于缝隙中的一边的分离轴,当然我们看一眼就知道选哪个边的垂直线(法线),但是计算机一眼看不出来,所以不防让多边形的所有边的法线作为分离轴来判断。

首先我们写一个辅助方法 getEdgesNormals,来获取多边形的所有边的法向量(垂直于边的向量)。

1
2
3
4
5
6
7
8
9
10
11
function getEdgesNormals(vertices) {
const normals = [];
for (let i = 0; i < vertices.length; i++) {
const j = (i + 1) % vertices.length;
const edgeX = vertices[j].x - vertices[i].x;
const edgeY = vertices[j].y - vertices[i].y;
// 计算法向量
normals.push({ x: -edgeY, y: edgeX });
}
return normals;
}

上述 (edgeX, edgeY) 获取到的是边的向量,所以 (-edgeY, edgeX) 就是对应的法向量(垂直于边的向量),因为原向量和法向量的 点积0 。不明白什么是 点积 也没关系,我画了一个图,相信你一眼就看明白了:

求法向量

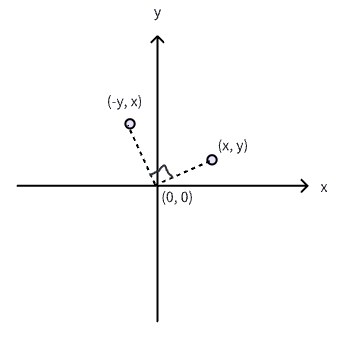
当然 (edgeY, -edgeX) 也可以作为法向量,只是方向不同,我们这里只要取一个方向就行了。

我们再写一个辅助方法 project,用来计算多边形顶点到某条分离轴投影的最大值和最小值。通过顶点在分离轴上投影的最大值和最小值就可以确定多边形在分离轴上的投影范围。

1
2
3
4
5
6
7
8
9
10
11
function project(vertices, axis) {
let min = Infinity;
let max = -Infinity;
for (let vertex of vertices) {
// 坐标轴原点到顶点的向量与轴向量的点积 就是顶点到轴的投影大小
const dotProduct = vertex.x * axis.x + vertex.y * axis.y;
min = Math.min(min, dotProduct);
max = Math.max(max, dotProduct);
}
return { min, max };
}

接下来就是分离轴的核心方法了:

1
2
3
4
5
6
7
8
9
10
11
12
13
14
15
16
function isCollisionPolygonPolygon(vertices1, vertices2) {
const axes1 = getEdgesNormals(vertices1);
const axes2 = getEdgesNormals(vertices2);
const allAxes = [...axes1, ...axes2];

for (let axis of allAxes) {
const projection1 = project(vertices1, axis);
const projection2 = project(vertices2, axis);

// 检查投影是否重叠
if (!(projection1.max >= projection2.min && projection2.max >= projection1.min)) {
return false; // 只要有一个轴不重叠,就没有碰撞
}
}
return true; // 所有轴都重叠,发生碰撞
}

代码并不多,首先获取到2个多边形的边的法线,也就是分离轴。然后遍历所有分离轴,在每次循环中,分别对2个多边形的点的投影到这条分离轴上,找出两个图形投影的最大值和最小值,由于2个图案是在同一个分离轴上的投影,所以只要比较最大值和最小值的关系就可以判断是否发生重叠,进而知道多边形是否发生碰撞。当 (projection1.max >= projection2.min && projection2.max >= projection1.min) 的时候表示重叠了,取反表示没有重叠,有不重叠的分离轴则说明没有发生碰撞。当然 !(projection1.max >= projection2.min && projection2.max >= projection1.min) 不好理解的话,你可以可以写成 (projection1.max < projection2.min) || (projection2.max < projection1.min) , 也就是检测碰撞的两个多边形中其中一个投影的最大值小于另一个投影的最小值(投影是一维度的,这里可以想象成一条坐标轴上两个线段判断重叠的场景),则说明这个多边形投影的最大值和另一个多边形投影的最小值之间是有空隙,所以不存在重叠。不重叠的话就说明两个多边形没有发生相交(碰撞)。

上面的代码已经可以正常使用了,不过有的时候我们还希望知道 交叉深度分离轴向量,以方便后续对碰撞处理,所以最好返回一个对象,把这两个信息也添加进去。

1
2
3
4
5
6
7
8
9
10
11
12
13
14
15
16
17
18
19
20
21
22
23
24
25
26
27
28
29
30
31
32
33
34
35
// SAT 碰撞检测函数
function isCollisionPolygonAndPolygon(vertices1, vertices2) {
const axes1 = getEdgesNormals(vertices1);
const axes2 = getEdgesNormals(vertices2);
const allAxes = [...axes1, ...axes2];

let minOverlap = Infinity;
let collisionAxis = null;

for (let axis of allAxes) {
const projection1 = project(vertices1, axis);
const projection2 = project(vertices2, axis);

const overlap = Math.min(projection1.max, projection2.max) - Math.max(projection1.min, projection2.min);

if (overlap < 0) {
return {
isColliding: false,
depth: 0,
axis: null
};
}

if (overlap < minOverlap) {
minOverlap = overlap;
collisionAxis = axis;
}
}

return {
isColliding: true,
depth: minOverlap,
axis: collisionAxis
};
}

此时的效果如下

多边形与多边形碰撞

圆与多边形的碰撞检测

在一个系统中使用多种碰撞检测往往比较复杂,圆与多边形的碰撞检测往往是把圆转换成多边形,然后进行多边形与多边形的碰撞检测。

我们给 Ball 类添加一个方法 getVertices,用来获取圆的多边形顶点,这里把圆当做正多边形来处理,如果顶点数是奇数则加1,使之成为偶数正多边形,毕竟偶数正多边形更像圆。

1
2
3
4
5
6
7
8
9
10
11
12
13
14
15
16
17
18
19
20
21
22
23
24
25
26
27
28
29
30
31
32
33
34
35
36
37
38
39
40
41
42
43
44
45
46
47
48
49
50
51
class Ball {
constructor(context, options = {}){
this.context = context;
this.x = options.x || 0;
this.y = options.y || 0;
this.radius = options.radius || 20;
this.color = options.color || '#000';
this.vx = options.vx || 0;
this.vy = options.vy || 0;
this.ax = options.ax || 0;
this.ay = options.ay || 0;
}

update() {
this.vx += this.ax;
this.vy += this.ay;
this.x += this.vx;
this.y += this.vy;
}

draw() {
this.context.save();
this.context.beginPath();
this.context.fillStyle = this.color;
this.context.arc(this.x, this.y, this.radius, Math.PI / 180 * 0, Math.PI / 180 * 360);
this.context.closePath();
this.context.fill();
this.context.restore();
}

isContainsPoint(x,y){
return Math.hypot(this.x - x ,this.y - y) < this.radius;
}

getVertices (maxSides = 25) {
// 若边数为奇数则加 1 使其具有偶数边
const numSides = maxSides % 2 === 1 ? maxSides + 1 : maxSides;
const vertices = [];
const angleStep = (Math.PI * 2) / numSides;

for (let i = 0; i < numSides; i++) {
const angle = i * angleStep;
const vertexX = this.x + this.radius * Math.cos(angle);
const vertexY = this.y + this.radius * Math.sin(angle);
vertices.push({ x: vertexX, y: vertexY });
}

return vertices;
}

}

上述代码中 getVertices 中,边数 maxSides 过小的时候误差比较大,过大的时候误差较小,但性能变差了,这里默认值是 25(实际是 26 边形)。之所以取 25 是因为 matter.js 取的就是 25

判断的时候就可以把圆当做多边形来处理的代码如下:

1
isCollisionPolygonAndPolygon(boll.getVertices(), polygon2.getVertices()).isColliding

此时的效果如下

圆与多边形碰撞

凹多边形的碰撞检测

我们看一下凹多边形使用分离轴定理的结果,效果如下

凹多边形碰撞

处理凹多边形的碰撞是拆分成多个凸多边形,然后进行碰撞检测,一般我们会通过 耳切法 把凹多边形切割成多个三角形(凸多边形)来处理。

凹多边形的碰撞检测作为了解即可,这里就不细讲了,直接给出代码:

1
2
3
4
5
6
7
8
9
10
11
12
13
14
15
16
17
18
19
20
21
22
23
24
25
26
27
28
29
30
31
32
33
34
35
36
37
38
39
40
41
42
43
44
45
46
47
48
49
50
51
52
53
54
55
56
57
58
59
60
61
62
63
64
65
66
67
68
69
70
71
72
73
74
75
76
77
78
// 计算两点间向量叉积
function crossProduct(p1, p2, p3) {
return (p2.x - p1.x) * (p3.y - p1.y) - (p2.y - p1.y) * (p3.x - p1.x);
}

// 耳切法将凹多边形分解为三角形(凸多边形)
function earClipping(vertices) {
const triangles = [];
const remainingVertices = [...vertices];

while (remainingVertices.length >= 3) {
for (let i = 0; i < remainingVertices.length; i++) {
const a = remainingVertices[(i - 1 + remainingVertices.length) % remainingVertices.length];
const b = remainingVertices[i];
const c = remainingVertices[(i + 1) % remainingVertices.length];

// 判断是否为凸耳
if (crossProduct(a, b, c) > 0) {
let isEar = true;
for (let j = 0; j < remainingVertices.length; j++) {
if (j !== i && j !== (i - 1 + remainingVertices.length) % remainingVertices.length && j !== (i + 1) % remainingVertices.length) {
const point = remainingVertices[j];
// 判断点是否在三角形内
if (isPointInTriangle(point, a, b, c)) {
isEar = false;
break;
}
}
}
if (isEar) {
triangles.push([a, b, c]);
remainingVertices.splice(i, 1);
break;
}
}
}
}
return triangles;
}

// 判断点是否在三角形内 也可以使用上面射线法的代码
function isPointInTriangle(p, a, b, c) {
const areaABC = Math.abs(crossProduct(a, b, c));
const areaPAB = Math.abs(crossProduct(p, a, b));
const areaPBC = Math.abs(crossProduct(p, b, c));
const areaPCA = Math.abs(crossProduct(p, c, a));

return Math.abs(areaABC - (areaPAB + areaPBC + areaPCA)) < 1e-9;
}

// 修改后的 SAT 函数,支持凹多边形
function isCollisionConcavePolygon(vertices1, vertices2) {
const convexPolygons1 = earClipping(vertices1);
const convexPolygons2 = earClipping(vertices2);

let minDepth = Infinity;
let collisionAxis = null;
let isColliding = false;

for (let poly1 of convexPolygons1) {
for (let poly2 of convexPolygons2) {
const collisionResult = isCollisionPolygonAndPolygon(poly1, poly2);
if (collisionResult.isColliding) {
isColliding = true;
if (collisionResult.depth < minDepth) {
minDepth = collisionResult.depth;
collisionAxis = collisionResult.axis;
}
}
}
}

return {
isColliding: isColliding,
depth: isColliding ? minDepth : 0,
axis: isColliding ? collisionAxis : null
};
}

此时的效果如下

凹多边形的碰撞检测

-------------本文结束 感谢您的阅读-------------
0%