Electron是使用 JavaScript, HTML 和 CSS 构建跨平台的桌面应用的一个框架,本人之前写的一个放烟花的程序fireworks-cool就是基于这套框架来做的。electron在跨平台应用方面做的还是挺好的,著名的编辑器VS Code与Atom都是使用Electron来开发的。有了Node,前端工程师可以直接干后端的事了;有了Electron,前端工程师可以直接干桌面应用工程师的事了。昨天研究这个touchbar,真心感觉到了JavaScript的无所不能属性,明天我们开发一个操作系统😊。
吹了这么多Electron,我们再说说touchbar吧。我觉得touchbar是Mac上一个鸡肋的功能,我在使用Mac的时候很少去关注touchbar。昨天忽然想到Electron可以开发桌面应用,那么是否可以做touchbar相关的功能呢?于是看了下它的官方文档,发现确实是可以开发touchbar相关的功能,不过目前Electron的touchbar还是实验性的API,后续有可能更改也有可能去掉,不过并不影响我们先玩玩它。玩玩它后,你会发现鸡肋的touchbar还是有点意思的。当然touchbar是Mac特有的硬件,如果不是Mac的小伙伴就体验不了本章的内容了。
运行官方的例子
官方给了一个老虎机的一个例子,这个例子还是很有趣的,感兴趣的可以直接点击这里查看。如果连接打不开,可以直接看下面的代码,我已经帮你拷贝好了:
1 | const { app, BrowserWindow, TouchBar } = require('electron') |
运行上面的代码:
建立一个文件夹,比如
touchbar-demo,再创建一个文件touchbar.js,将上面的代码拷贝进去。当前目录下,在命令行输入下面的内容来安装
Electron。ELECTRON_MIRROR=http://npm.taobao.org/mirrors/electron/ npm install electron
命令行执行下面内容以启动:
./node_modules/.bin/electron touchbar.js
你可以看到我们安装Electron的时候加了一个ELECTRON_MIRROR的参数,为什么要带这个参数呢?其实在npm install electron的时候会下载electron依赖,这个依赖有一个postinstall的脚本,该脚本会继续从github下载当前平台的Electron应用程序,由于国内对国外网站的限制,虽然github是可以访问的,但是网速不咋样。所以直接访问的话往往会有下载失败的问题(即使npm的源切换到taobao也经常出现问题,因为下载Electron应用程序是走github的下载地址的,下载地址具体请看这里)。
通过上述三个步骤,实例代码基本上可以跑通了,大概效果如下,是不是很有意思呢?
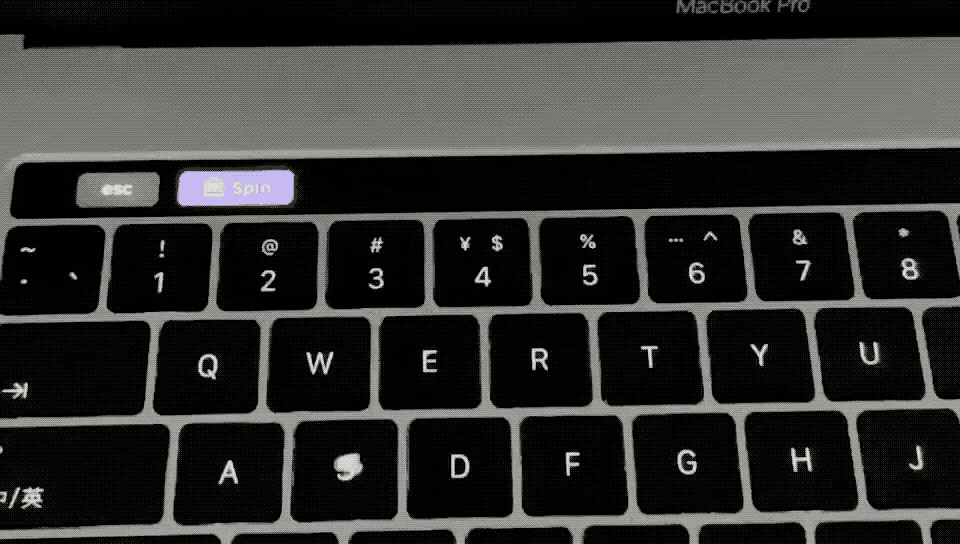
组件
通过上面的代码我们可以看到,通过new TouchBar()创建了一个TouchBar的实例,然后调用BrowserWindow对象的setTouchBar()方法就可以了,TouchBar的构造方法的参数是一个对象,这个对象可选字段有2个,一个是items,另一个是escapeItem。items是一个数组,用来添加touchbar中间部分的组件。escapeItem是单个的一个组件,用来替换touchbar左侧的esc按钮。
现在我们新建一个index.js,运行下面代码(命令行输入./node_modules/.bin/electron index.js),看看效果:
1 | const { app, BrowserWindow, TouchBar } = require('electron') |
运行结果如下:
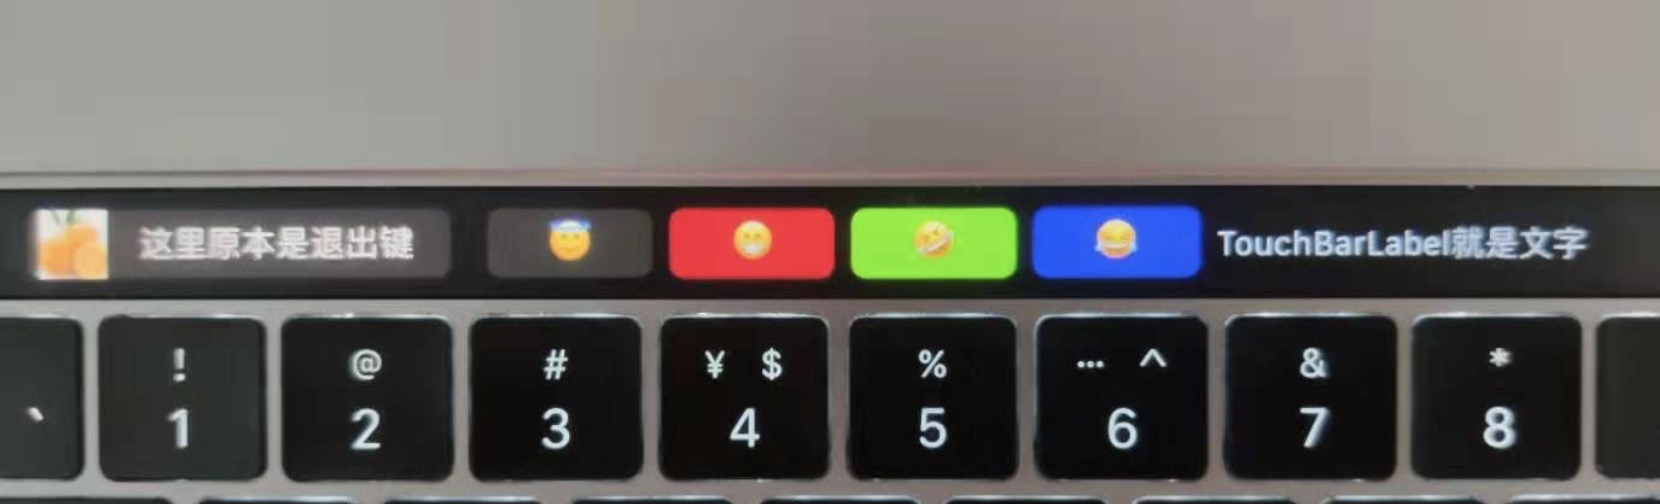
代码中第29行的图标点击这里下载。
上面使用了2个组件,一个是TouchBarButton,代表的是一个按钮,另一个是TouchBarLabel,代表的是一个简单的标签。需要注意的是TouchBarLabel只是单纯的文字,不支持点击事件(当然你使用的时候有可能API已经支持了),它的参数也很简单,就是上面例子中的那2个,TouchBarButton是支持点击事件的,如上面escapeItem中的click方法。
Electron所支持的所有组件(写本章的时候)有:
- TouchBarButton
- TouchBarLabel
- TouchBarColorPicker
- TouchBarGroup
- TouchBarPopover
- TouchBarScrubber
- TouchBarSegmentedControl
- TouchBarSlider
- TouchBarSpacer
这里给一个简单的例子展示一下其中的几个组件,剩下的你可以自己去尝试一下:
1 | const { app, BrowserWindow, TouchBar } = require('electron') |

PS:学会了这个,就有了后来的一个小项目touchbar-emoji,使用touchbar来控制飘落emoji表情雨。